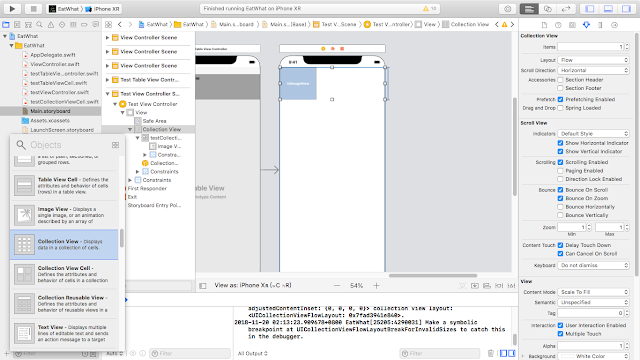
CollectionView作法與TableView很像,首先在一個空白的storyboard中新增元件Collection View(如下圖所示),點選元件將右邊狀態列中Scroll Direction改為Horizontal
將CollectionView的layout設定好後,點選CollectionView,按住ctrl拖拉至上面黃色view controller,選取deleSource及delegate
新增一個UIimage元件,之後於左列檔案中新增一個cocoa touch class: UICollectionViewCell
點選新增的UIImage,按住ctrl拖拉至UICollectionViewCell,新增該元件設定
回到viewController.swift,於class屬性中新增UICollectionViewDelegate,UICollectionViewDataSource
之後新增一個array儲存照片名稱,
在
func collectionView(_ collectionView: UICollectionView, numberOfItemsInSection section: Int) -> Int {
return imageArray.count
}
中回傳array中的資料數,在func collectionView(_ collectionView: UICollectionView, cellForItemAt indexPath: IndexPath) -> UICollectionViewCell {
let cell = collectionView.dequeueReusableCell(withReuseIdentifier: "testCollectionViewCell", for: indexPath) as! testCollectionViewCell
cell.imageView.image = UIImage(named: imageArray[indexPath.row])
return cell
}
中,先設定dequeueReusableCell,在withReuseIdentifier:中輸入設定的CollectionViewCell的名稱,並用as! 指向CollectionViewCell.swift檔最後設定資料顯示方式cell.imageView.image = UIImage(named: imageArray[indexPath.row])
在用return回傳cell即可
* 記得cell元件的identifier名稱要設定! 在storyboard右邊 有一個identifier欄位


留言
張貼留言